
I love color. There are so many things about it that make me completely happy- especially bright colors. So I have a quick pictorial for you today… with lots of color! Links for all products will be at the very end.

Step 1) Lay some color on a piece of watercolor paper. I used Neocolor II crayons to do this, and since I knew what stencil I was going to use, I cheated a bit, and added color accordingly.

Step 2) Once the color is as you’d like it, get out your water brush and make the crayon lines disappear! The less water the better, you don’t want to over saturate your paper.

Step 3) Position the stencil on the color you’ve put down and adhere it using removable tape- anything else could rip your paper.

Step 3.5) Apply translucent embossing paste over butterfly stencil.

Step 4) While the paste is still wet, apply embossing powder. Then heat set the powder. You may notice it’s still cloudy- remember, that’s because the paste is still wet. It will take a little while to dry, depending on how much paste you’ve used.
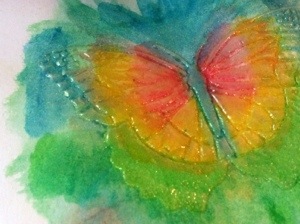
Step 5) Cut out the butterfly when it’s completely dry. If you like the look of the butterfly in step 4, you can use white embossing paste instead of translucent.

Step 6) Apply continuous glue lines to the body of the butterfly, and mini glue dots to each corner. Then adhere to the card, scrapbook page, etc.

%20)
The card: I stamped the sentiment, going places, and the squiggle with VersaFine then heat embossed it with Angel Wings Gold embossing powder. I love the raised effect, and the slight shimmer on both the butterfly and sentiment that really make them pop, not to mention the dimension of the butterfly!
Products used:
- Scallop Butterfly Stencil LM225
- Translucent Embossing Paste
- Angel Wings Gold Embossing Powder
- Continuous Glue Lines
- Mini Glue Dots
- VersaFine (Onyx Black)
- Smak Kit: Going Places (sentiment and squiggle)
- Watercolor paper
- Cran d’Ache Neocolor II Crayons
- Water Brush
Visit the Dreamweaver Stencils designers for more inspiration!
Dream It Up! | Wendy | Laura | Lyn | Pam | Heidi | Louise | Cyndi


Your final card has a CAS quality to it with a great pop of white space, but that butterfly is a bit more than that! Really beautiful technique, Jessica! Thanks for all of the great pics and details!
Fantastic technique! The card turned out so beautiful!
Love the idea of scribbling color to create the eye popping butterfly making a beautiful card Jessica!
Wow this is a great idea and it looks wonderful. Thanks for sharing.
This is such a wonderful creation…love the graphic feel and thanks for the tutorial on how you created the butterfly.
Wow Jessica, this turned out fabulous! I love the whole process, very creative!
Lovely creation!!!
Love,
Bong’s Belleza
Have a happy Tabloid Tuesday
Great look to the finished butterfly and sound so fun to make with the techniques! Gorgeous card!!
Very pretty end result Jessica! Thanks for the lovely detailed tutorial.
Oh yeah! Hadn’t thought about using my watercolor crayons with my stencils! Thanks for the inspiration! Both cards are really pretty! I love the sparkly goodness on the first card and the butterfly is just fantastic!
What a great card…and thank you soooooo much for the tutorial….well done!
Paper Hugs,
Jan